This will detail the design and construction of the galley counter. Below is the counter as designed in Sketchup. The countertop itself, which will be 1.5″ butcher block, is only wire-framed so that the underlying structure is visible.
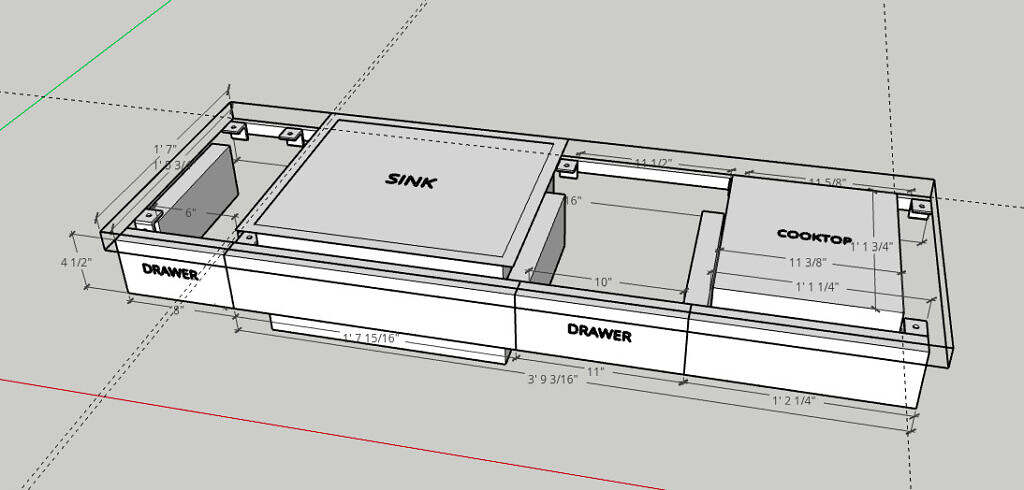
For the front face of the counter, which would also be the primary support for the butcher block, I chose to use 15 series 4.5″ x 1.5″ 8020. These are the two pieces in front of the sink and induction cooktop. The sink and cooktop will be mounted in holes cut into the counter top, which left room for a 9″ wide drawer between those two components and another, smaller 4″ drawer on the far left. I tend towards a minimalist ascetic, so I wanted as few fasteners visible as was possible without compromising the integrity of the structure. As always, one has to keep in mind that this would be subject to vibration and side loading while driving. Initially I had settled on one drawer, but tinkering with the design in Sketchup, I realized that I had room for the slightly smaller drawer to the left of the sink, which could function as my bathroom drawer for things like toothpaste, floss, spare razor blades, etc. While relatively narrow, both these drawers are 14″ long and 4-1/4″ deep. To mount the front support pieces I decided to drill and tap some holes in the edge of the counter, which is 1″x.5″ aluminum square tube. This would allow me to utilize the 8020’s T channel with some minor modifications to the 8020. In order to reach the hex bolt head to tighten them down, I needed to drill some access holes the height of the 8020. I could then use a T handle ball head hex wrench to tighten each bolt, thus securing the 8020 to the counter while leaving no visible fasteners. The access hole through the 8020 is 1/4″, though I did refine that and drilled out the bottom holes to 5/16 to allow the wrench some “play” when trying to blindly locate the bolt head. Overall it worked exceptionally well.


While I liked the Blum drawer hardware I ordered for the CPR cabinet drawers, I decided to make my own drawer boxen for the two galley drawers. The Blum drawer slides require a little more width than the 1/2″ of traditional, plain slides and space is at a premium under the galley counter.
I was debating between using 1/2″ MDF board and 1/2″ birch plywood both for the galley drawers as well as the tool crib drawers and the bottoms and backs of the CPR drawers. MDF is heavier and weaker, but less expensive, although that was a secondary consideration. What settled it for me was I found that Menard’s carried MDF finished with a smooth coating; blue on one side, grey on the other. This coating is much nicer than the particle board appearance of typical MDF and perfectly acceptable for the drawers.
Having never built drawers before I did a little research and determined that pocket holes were the best way to go for strength and simplicity for someone with my complete lack of woodworking skills. Some further research identified the Kreg Pocket Hole Jig and pocket hole screws as ideally suited to the task. The kit comes with a jig, a drill bit with integrated pilot hole drill and a square head driver bit for the screws. I went with 1″ coarse Kreg Pocket screws for the fasteners per their specs for 1/2″ material. I was a little concerned about the ability of the MDF to hold the screws, which is the main reason I went with pocket holes. I bought a 2′ x 4′ of the MDF to try out and it worked well enough to proceed. It is necessary to be a little careful with edges of the MDF, as it does chip easily, but otherwise it was plenty strong for my purpose.
The small galley drawers were fairly easy to put together. It took a few holes to get the feel of the pocket hole jig and make some finite adjustments, but it’s a fairly clean and easy system. The bigger tool crib drawers, which I’ll detail in another post, were a little more difficult to assemble, especially the long sides. Had I known ahead of time, I would have invested in a corner clamp which would have made drawer assembly much easier. However, by the time I thought of it I only had two drawers left to do so I made do with the clamps and work table I had. Though I’m not sure it was necessary, I also decided to add wood glue to all the joints to add some strength. Once screwed and glued, the drawers felt super strong and I was pleased with the results. They’re not particularly pretty, but are certainly functional. Fortunately the drawer fronts will cover up most of my minor mistakes. The galley drawers will use push-to-open drawer slides. Basically you push on the drawer front and the drawer pops out an inch or two. This will hopefully allow me to avoid using drawer pulls and have the added benefit of holding the drawers closed with a fair amount of force so they wont vibrate open or slam open every time I make a left turn. Below are the finished drawers installed in the counter.

