While the truck has copious amounts of built-in storage that I intend to re-use with little or no modification, I also needed some additional cabinets, shelves and drawers to make living in it full-time a little more comfortable. Wood would be the obvious choice, but I have zero skill when it comes to woodworking. It also seemed like that route would require extra tools for joinery, not to mention that wood cabinets would likely end up being creaky when driving down the road. Instead I settled on using 8020 aluminum extrusion also known as T-slot.
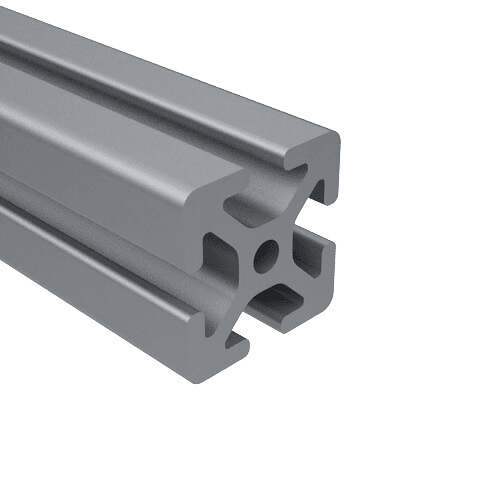
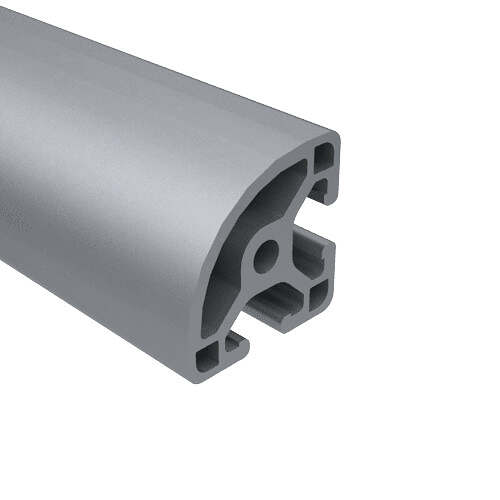
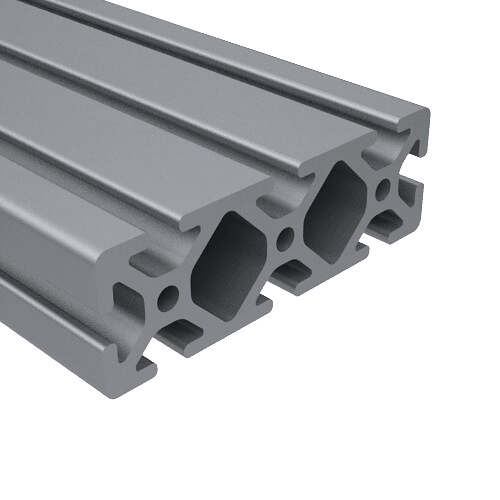
I’ve seen 8020 used in various manufacturing settings over the years, so I had an idea of what was possible with it. It requires little more than a circular saw and a drill to prepare it for assembly. Compared to wood it’s also far more consistent as you don’t have to worry about warping, grain, knots, etc. Since I was going to have a fair amount of cuts to make, I bought an inexpensive miter saw from Lowe’s and an aluminum cutting blade. 8020 comes in standard profiles of 1″ x 1″ (10 series), 1.5″ x 1.5″ (15 series) and several larger sizes as well as metric sizes. In addition, each series has a variety of profiles to choose from. For example, there is a .5″ x 1″ in 10 series as well as .75″ x 1.5″ in 15 series. Each is also available in plain aluminum, smooth or grooved, or anodized and you can get them with one or more sides smooth or even curved. Besides the profile, there are all kinds of different connectors and accessories that allow you to make just about anything imaginable; hinges, latches, handles, etc. Here are a few examples of the profiles I’m using:

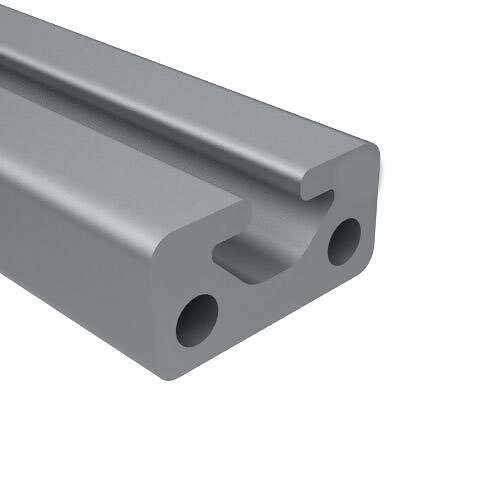
Cost wise, it’s not super cheap, but if you include the fasteners it’s on par with the cost of hardwood. I think it also looks good and doesn’t require any additional finishing such as staining or painting. However, it’s important to consider how it will be assembled to ensure you have adequate clearance to access the fasteners and that you make it as simple as possible to minimize the number and type of fasteners needed.
As I detailed in another post, I also found some convenient (and less expensive) shortcuts to use when working with 8020. For example, the channel in the 10 series profile is perfectly sized to fit the head of a 1/4-20 carriage bolt and the channel in 15 series accepts a 5/16-18 carriage bolt so you can avoid the extra expense of having to buy specialty t-nuts in many cases.
Below I describe each of the major pieces I’m building.
Control Panel
This will contain all the screens, breakers, switches and fuses. The cabinet will consist of a frame and a two door, hinged front panel to make maintenance easier. The space behind the panel was previously used as plenum for the heat pump. Meaning hot or cold air was blown out of the heat pump, up through this space, and out a set a louvered vents at the top. Even if I end up using the heat pump in the future, I can plumb air vents from lower down in the cabinet. Keeping in mind the original truck design had to support two to three paramedics, a patient and possibly additional passengers, which required a lot more air flow to keep things cool/warm. This cabinet will use 10 series profile as it’s not going to support any significant weight. My original design was a single panel door. However, because of the route I ran the AC wiring and where I’ll mount the AC breaker panel, it will be somewhat cumbersome to fully open that door to access the wiring. I therefore split it into two sections, with the upper door panel supporting the AC breaker panel, the security monitor, the Victron Touch screen and a few other displays I plan to add in the future. The larger lower section will hold the WeatherDeck switch panels and all the individual DC switches. The panel of the doors will be blue HDPE or possibly clear acrylic, depending on how the wiring looks when I’m done.
Galley Counter
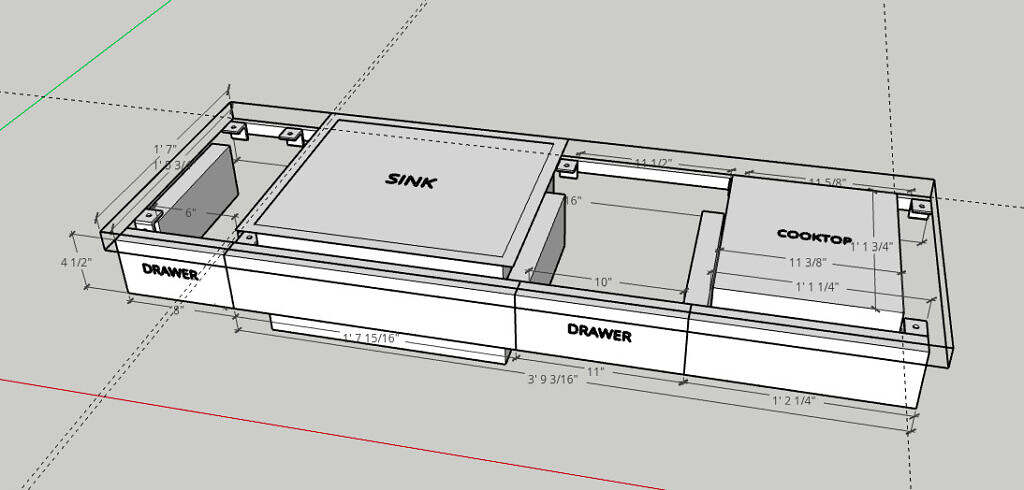
The biggest requirement here was to raise the countertop up to a comfortable working height of 34″-36″. This extra height also provided enough space to build the induction cooktop into the countertop and select a 9″ deep sink. I also managed to fit a 9″ wide x 16″ deep x 4″ tall drawer into the front face of the counter squeezed between the sink and the cooktop and an 8″ wide one to the left of the sink. The horizontal pieces supporting the front of the countertop are fashioned from 1.5″ x 4.5″ 15 series profile. This required a bit of thinking, fueled by beer, to mount. I could have gone the easy route and simply used L brackets bolted to the underlying counter and the profile, but this would result in a number of visible bolts in the utility cabinet directly below, which I wanted to avoid. The front ledge of the counter is a square aluminum tube approximately .1″ x 1.5″. What I did was drill some 5/16″ holes into that front ledge and tap them for 5/16-18 thread. This allowed me to put the bolts in and slide the profile in from the side. I then drilled access holes vertically through the aluminum profile so that I could tighten the hex head bolts with a long handled, ball head hex wrench. I initially ran into a little trouble as I drilled the access hole only one size bigger than the wrench diameter. This required a lot of fiddling to exactly align the wrench and bolt head since the wrench had to pass through a total of six layers to ultimately reach the bolt head. To allow for some flexibility in locating the bolt heads I drilled the access holes several sizes larger to allow for some movement of the wrench shaft. This wiggle room worked out really well and the method provided a rock solid foundation for the countertop. The rear edge of the counter is supported by a 1″ x .5″ 10 series profile which I will use to attach the countertop from underneath in 4-5 places. The open spaces in the front edge support is for two drawers and the blue painters tape is there to prevent scratching the aluminum.


This is also only one of a few areas of the truck where I modified the existing structure. I discovered another 5″ of space behind the counter backsplash (in fact behind the entire left-side cabinet running the length of the module). I decided to incorporate some recessed storage here to make use of the space and give me easy access to the wiring that runs behind there, including the inlets for the shore power plugs and where many of the wires run down into the utility cabinet. I’m fabricating those shelves from scratch using materials scavenged from other parts of the truck and I’ll detail that in another post.
Speaking of power (was I?), I’ve run several new 110V AC outlets into the galley. There is a dedicated circuit for the induction cooktop under the counter top and another that provides power to a semi-concealed outlet in the recessed shelves and another in the toothbrush cabinet for charging my Sonicare toothbrush.
CPR Drawers & Shelf
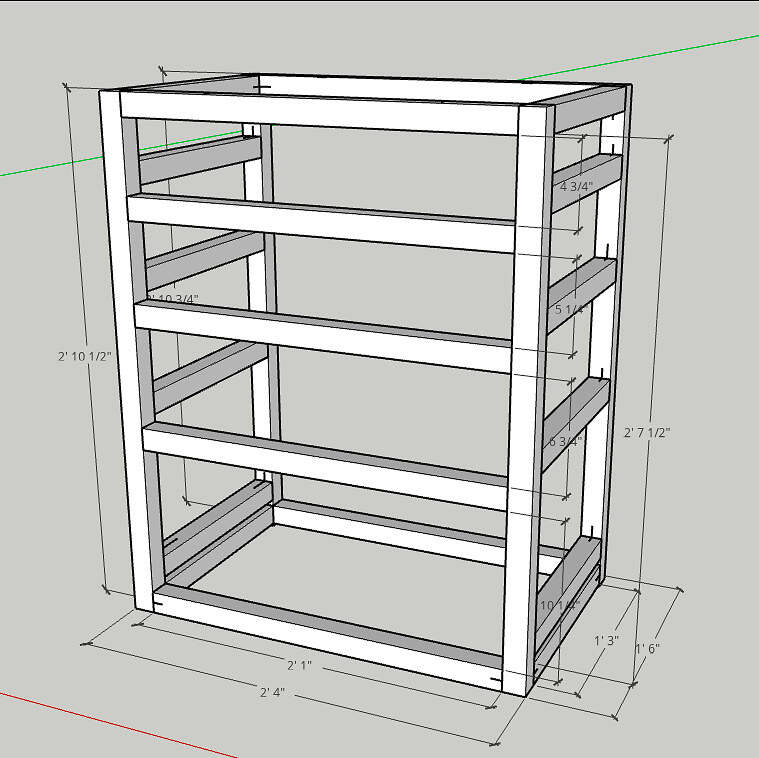
Early on I visualized using the CPR bench as space for a cabinet of drawers which would also provide some additional counter space for storage of kitchen appliances. This cabinet is made out of 15 profile and will accommodate four drawers and the same butcher block counter top as the galley counter. A note on the difference between 10 series and 15 series. The 10 series profile is plenty strong enough to use almost anywhere, however what it comes down to is the size of the fasteners that you can use. I read some online reviews that described the smaller fasteners used on the 10 series as being easier to break and in some cases people sheared the bolt heads off during assembly through over-tightening.
I also added an additional 110V AC outlet at the rear of the upper counter for the air fryer I plan to have there.
There is an additional space under the CPR bench which is approximately 54″L x 19″W x 9″H that was accessed by lifting up the hinged CPR bench. As this will blocked by the drawers, I plan to cut an opening in the side below the CPR bench. I intended to install another 2-3 drawers in this space, but given that it’s lined in aluminum diamond plate that I don’t really want to cover up, I will likely just make these cabinets with flip-up or flip-down doors.
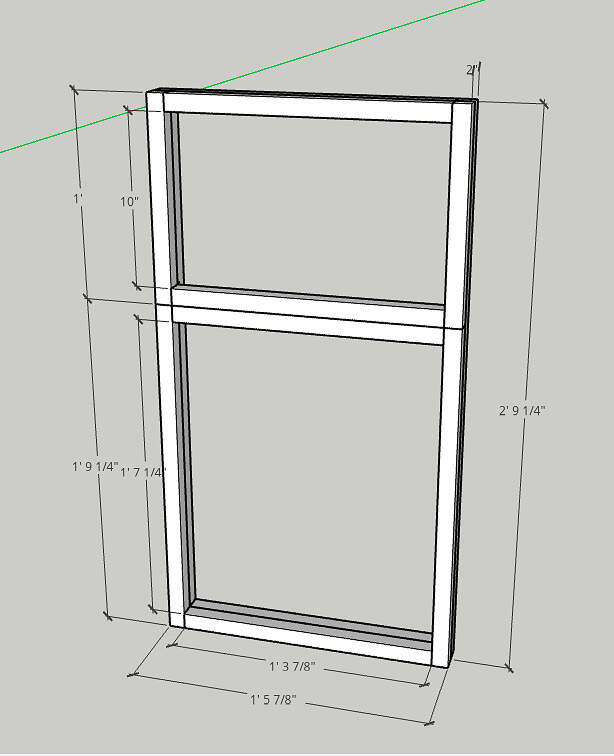
Bunk Cabinet
From early pictures you may recall there was an existing cabinet running the full length above the squad bench. Like everything else in the truck, it was wildly overbuilt. I decided to replace it as the cabinets were shallow and didn’t make good use of the space, at least from the perspective of someone living it the truck full-time as opposed to paramedics who need quick access to supplies. The cabinet also had a section at the end that contained an extra oxygen port.
This cabinet will be built out of 15 series profile and paneled with blue HDPE. I decided to use recessed anchors to connect all the pieces rather than L brackets, given that almost all of them would be visible on the inside of the cabinet when the doors are open.
When installed, this cabinet will bolt to the ceiling and the bunk wall. The small shelf below the cabinet in the drawing is a bookshelf, though I haven’t finalized it’s design or how I’m going to mount it just yet.
Locker E
While the fridge will take up most of the space previously used by cabinets, there is approximately 4.5″ available for use as shelving and accessible from the outside locker door. As this is where I plan to shower, I will likely store soaps and whatnot here. I’m also adding a GFCI protected outlet here.
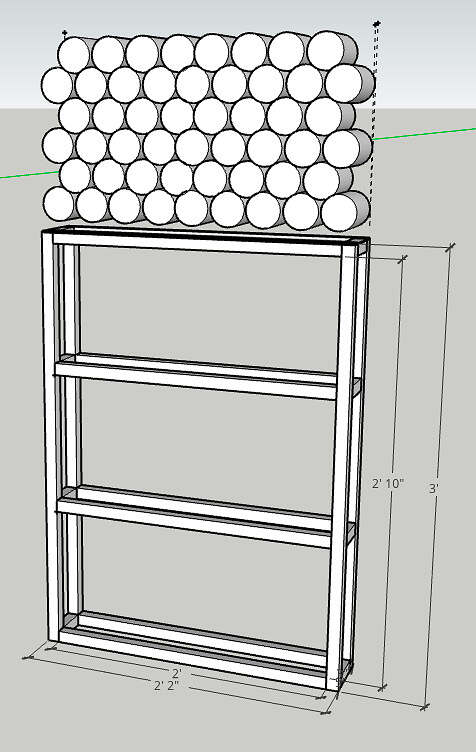
Since these shelves will only be accessible from the outside locker door, approximately 16″ will be out of easy reach. Not wanting to waste any potential storage space, I’ve devised a way to store 40+ cans of food there on a pull-out shelf accessible from inside the truck. While cans come in different sizes, the most common standard seems to be roughly 3″ in diameter by 4-3/8″ tall. I haven’t yet devised the exact drawer design, which is why the cans appear to be floating in the drawing.
Tool Crib
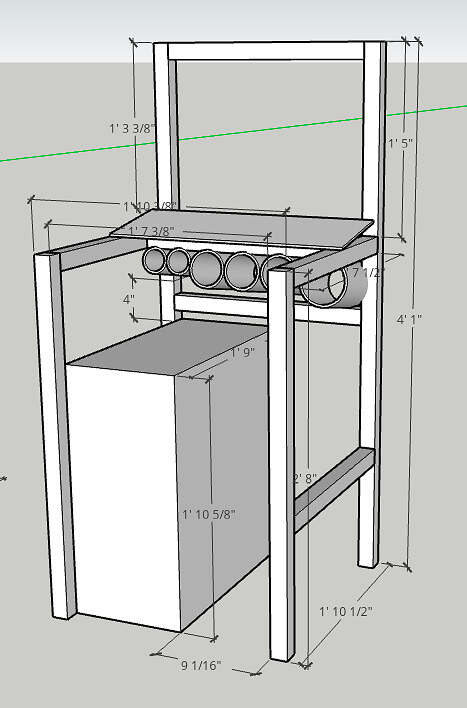
Other than a mount for an oxygen cylinder, this locker was just an empty space when I received the truck. I knew I wanted to store as many tools as possible here and also make them easily accessible. That would require some shelving, space to hang things, power tool storage and some kind of toolbox to keep smaller items organized.
I didn’t want drawers to take up the entire space so I looked around for a small tool cabinet drawer. I found some that were ideal, except they came with the staggering price tag of $1000. I also considered building a pull out shelf where I could mount my Dad’s tool box, but this would prove rather cumbersome to use. I settled on a tall narrow cabinet of drawers designed for a pickup truck bed. It has four narrow, but long drawers of varying heights that will be perfect for organizing hammers, screw drivers, sockets, wrenches, pliers and other small hand tools. The 8020 frame I designed is mainly there to provide storage for my growing collection of Milwaukee power tools and hanging space for things like my welding mask, face shield and respirator. The tool holsters will be made out of PVC pipe. I’ll also have a shelf made of blue HDPE to mount two Milwaukee battery chargers since I’ll be running a 110V AC circuit to this locker. I may also add some pegboard on the side or rear to provide additional space to mount other tools. Another idea I had was to 3D print some holders for cans of commonly used things like WD-40 and brake cleaner. Some of the bigger items, such as the bottle jack and jack stands will go in the lower section of Locker E along with the air compressor and air hose reel.
Cab
I haven’t finalized the design for this yet, so I don’t have a drawing to display. This shelving is on the opposite side of the tool crib cabinet. I didn’t want to take up too much space in the extended cab, but there was some wasted space behind and on top of the cabinet so I though it would be a good place to store service manuals and documentation for the truck, which at this point amounts to 4-5 three ring binders, as well as things I might need quick access to while driving: maps, work gloves, safety vest, road flares, etc.