The Rig will get power from several sources: A rooftop solar array, shore power or via the alternator when the truck is running. I will also have the option to add a separate generator at a later time, though I don’t anticipate doing that given the size of my solar array. These power sources will charge a 24V house battery system. A step-down DC-to-DC converter will convert battery power into 12V for things like lights, fans, USB ports, etc. The shore power hookup and batteries will also feed an inverter/charger which will make 120V AC power available for things like the induction cooktop, air fryer and mini-split heat pump that I plan to eventually install.
Solar Array Planning
My original plan called for a solar array composed of four 300-350 watt panels for 1200-1400 watts of generating capacity. However, once I removed the rooftop A/C unit I discovered that the 14″x 14″ hole I am re-using for a rooftop fan was not centered width-wise on the roof, which meant I couldn’t fit four panels of the size I had planned. Given the difficulty of cutting a new hole and the desire to avoid introducing potential water leaks reusing this hole was more important than fitting the panels to me. Time was on my side though as the lengthy delay in getting this project moving resulted in my discovering 400+ watt panels. I’m not sure if I wasn’t looking hard enough or they are relatively new to the market. It probably also didn’t help that my original research was in part based on YouTube videos that were a year or in some cases several years old.
One of the objectives for my roof layout was to have a reasonably sized area where I could plop a camp chair or two and enjoy morning coffee or evening beers using the collapsible ladder or via a roof hatch at some later date. I also favored the largest panels I could get given the huge expanse of available rooftop. Smaller panels have the advantage of being able to utilize more of the available space, especially if the roof has lots of obstacles to work around, but every panel has power connections and mounting requirements, all of which add many extra points of potential failure. Even though I’m going to be gluing my panels to the roof rather than screwing them, I wanted to minimize any potential permanent damage.
With the 400 watt panels I could get away with installing only three and still reach my generating goal of around 1200 watts. This could also be augmented later on by adding several smaller panels, utilizing the cab roof or even devising a multi-layered slide-out system. It’s also inevitable that solar technology will continue to improve and future panels will provide greater generating capacity at the same or even smaller footprint. Three panels also means that I gain some extra room for my rooftop deck.
I decided on three 400W Rec alpha PURE panels costing ~$440 per panel. There are less expensive panels that generate slightly more power (up to 490W), but they are 8″-10″ longer than the Rec panels so I’m willing to spend a little extra for a smaller footprint. Buying panels this big proved a bit of a challenge. The first place had a huge inventory of panels, which was useful for my research, but it turns out they only sell wholesale to professional installers. The second website appeared to be perfect, until I went to add three panels to my cart and was informed that the minimum purchase was six panels. After more searching and checking forums for reviews I settled on Northern Arizona Wind & Sun (solar-electric.com), which had good prices, and more importantly, were willing to sell me what I needed. Even got a personalized thank you from the owner, though it very well could have been automated.
Solar Array Wiring
Panels can be connected in series, in parallel or in series-parallel. Panels in series get their voltages added together while their amps stay the same. Panels in parallel get their amps added together while their voltages stay the same. Panels in series-parallel are treated the same with panels in each series string adding voltages and then the series strings in parallel summing their amps. Which method you use depends on the specifications of your panels and your solar charge controller who’s job it is to take the variable voltage coming from the panels and regulate it down to something consistent to charge your batteries efficiently. Essentially you want a high enough voltage that the charge controller can work efficiently, but also not excessive amperage in order to keep your wire size at a reasonable cost.
Solar panel performance improves the lower the ambient temperature. Panels are tested at a standard temperature, typically around 25C/77F, but in designing an array you have to account for the potential for the panels to put out more than their rated power the lower the temperature drops. There are formulas used to determine the maximum potential output of a given solar array, but fortunately there are also plenty of calculators online that do the heavy lifting for you. I used the Solar Charge Controller Calculator at Explorist.life, which is an excellent resource for all things RV-electrical related.
Solar Array Layout
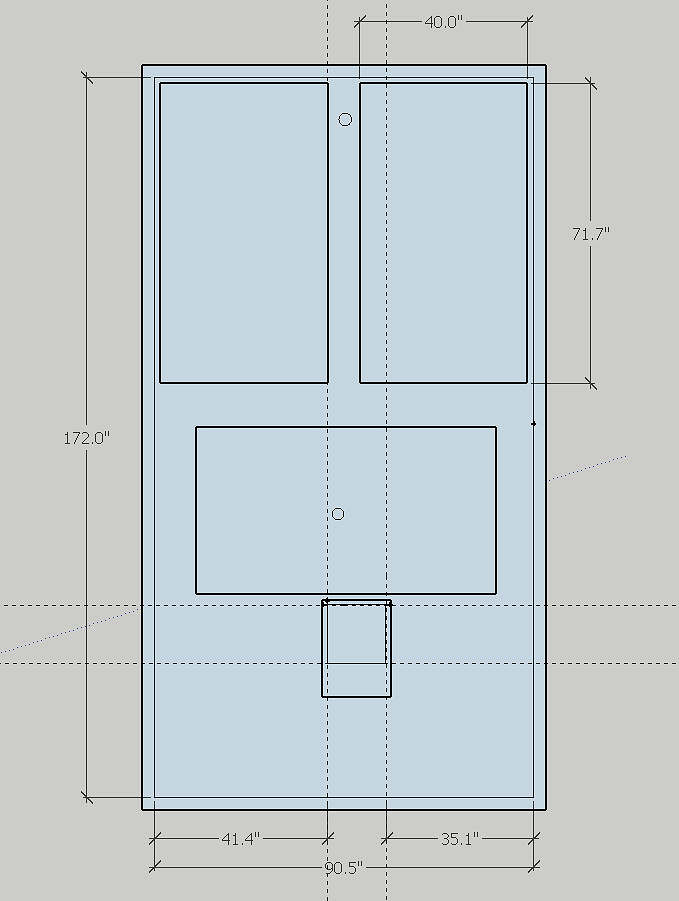
Above is my solar array design showing the layout of the three panels. The two small circles down the centerline are the existing holes for radio antennas. I’m going to seal the rear one and modify the front one for a wiring gland, which is a weatherproof enclosure to route the positive and negative power cables from the solar array into the module. The square/rectangle towards the rear is the existing 14″ x 14″ hole overlayed with the outline of the MaxxAir fan shroud. The small (3″) border around the roof is the rounded edge where water runs off into the rain gutter. Inside of that edge the roof is totally flat and that’s what I measured as “usable” roof.